Demonstration
The Heart Is the Compass
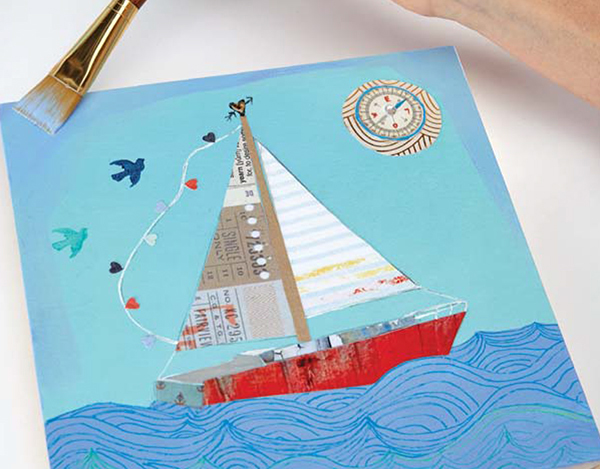
Voyage of Love
Get ready to set sail on a mixed-media voyage to all things nautical! In The Heart Is the Compass, you’ll navigate a variety of techniques—collage, painting, punching, stamping and drawing—to anchor this sailboat to a theme of love. Gather your blue, teal, red and white art supplies and your favorite seafaring collage elements, and put some sailing love songs on the playlist. This is going to be fun!

Materials used to create The Heart Is the Compass. Nautical collage elements can be downloaded at artistsnetwork.com/storytelling-art-studio-book-elements.
WHAT YOU NEED
SURFACE
wood panel, 8" × 8" (20cm × 20cm)
ACRYLIC PAINT
Brilliant Blue, Light Blue Violet, Neutral Gray, Phthalo Blue, Phthalo Green, Titanium White
BRUSHES
no. 2 round
1⁄4" (6mm), 1" (25mm) flats
OTHER SUPPLIES
acrylic gel medium
acrylic gesso (clear or white)
acrylic gloss medium
acrylic glue pen
bird stamp
brayer
collage paper (nautical themed, gold striped)
dictionary page or copy
gel pens (blue, turquoise, green)
heart punch
kraft paper
masking tape
paint markers (red, white, black)
ombré ink pad (blue/green)
palette knife
palette paper
pencil
picture of compass
reference materials: toy boat or photo of ship
sandpaper, fine grit
scissors
sketchbook
tracing paper
washi tape (transparent, nautical themed)
water
wax paper

STEP 1: Prepare the Background
With a 1" (25mm) flat, gesso an 8" × 8" (20cm × 20cm) wood panel with either clear or white acrylic gesso. Let it dry, then sand it with fine-grit sandpaper for a smooth surface.

STEP 2: Mix a Blue Background Color
Mix a batch of Brilliant Blue and Titanium White with a palette knife to use as a bright blue background color.

STEP 3: Paint the Background
Paint the entire surface of the wood panel with the bright blue mixture using a 1" (25mm) flat.

STEP 4: Draw the Sailboat
Using a toy boat or a reference photo, draw a sailboat in your sketchbook. Add a wavy line from the top of the mast to the bottom of the sail (this will become a flag of hearts). Submerge part of the sailboat underwater in the wavy ocean.

STEP 5: Trace the Drawing
Using the reverse transfer method, first trace the entire drawing.

STEP 6: Flip the Tracing and Trace Again
Flip the tracing upside down and go over the sketch again in pencil.

STEP 7: Transfer the Drawing
Once the paint has dried on the support, tape the tracing of the boat sketch onto the board and go over the sketch again, pressing down with the pencil along the lines. Lift the tracing paper to reveal the transferred drawing.

STEP 8: Paint the Ocean
Fill in the ocean with Light Blue Violet using a 1" (25mm) flat.

STEP 9: Cut Out a Sail Shape
Using the sailboat tracing as a guide, create a sail from a piece of striped paper. Use other collaged pieces for the other sail and the hull of the sailboat. Cut out all of the collage pieces.

STEP 10: Assemble the Collage
Assemble the collage pieces on your original drawing until you’re satisfied with the composition.

STEP 11: Add a Thematic Word
To add to the story’s love motif, cut out a thematic word from the dictionary (or a photocopy of the dictionary page) and fit it into your collage. I added the word “yearn” to the tip of my sail.

STEP 12: Adhere the Collage Pieces
Adhere the collage pieces to your board by using a 1⁄4" (6mm) flat to paint the entire sailboat with acrylic gel medium. Gluing the board, not the individual pieces, makes the collage much easier to lay down.

STEP 13: Add a Mast Shape
Cut a mast out of kraft paper and glue it to the center of the sailboat using acrylic gel medium or a glue pen.

STEP 14: Press the Pieces to the Board
When you’re happy with the collaged boat, cover it with a piece of wax paper and roll a brayer over the piece to fix it securely to the board.

STEP 15: Add Washi Tape to the Hull
Use transparent washi tape to add variety to the boat hull. You don’t need to trace a template for the washi tape. Since it’s transparent, just lay it over the boat and use a pencil to outline the collage shape.

STEP 16: Cut and Apply the Washi Tape
Cut out the washi tape collage piece and stick it right to the boat.

STEP 17: Paint the Boat Hull
Fill in any uncollaged parts of the boat hull with a no. 2 round and Neutral Gray.

STEP 18: Cut the Moon Shapes
Use a royalty-free piece of clip art for the compass in the center of the moon. Create a setting for the compass by tracing the bottom of your acrylic glazing medium container onto a piece of gold-patterned scrap paper.

STEP 19: Glue the Moon Shapes
Glue both the scrap paper and compass to the top right corner of your painting.

STEP 20: Punch or Cut Out Heart Shapes
Continue the love motif by punching out a series of red, blue and turquoise hearts that you’ll add to the ship’s flag. If you don’t have a heart punch, you can cut these by hand with small scissors.

STEP 21: Paint the Sailboat Flag
Use a white paint marker to paint the sailboat’s flag.
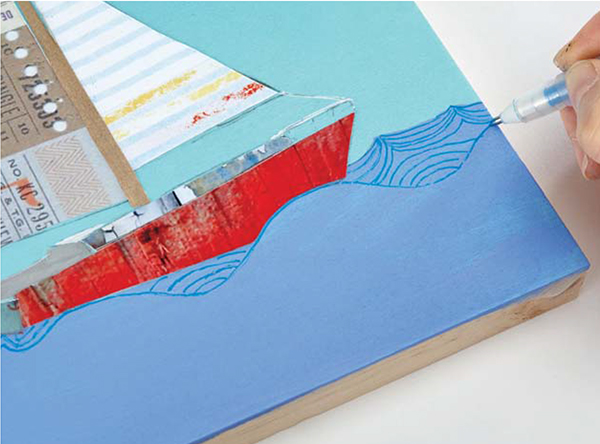
STEP 22: Begin Drawing the Waves
Use gel pens to create a line drawing of waves inside the larger block of ocean. With a blue pen, draw a series of wavy lines about halfway through the water. Next, fill these sections with non-intersecting wavy lines.

STEP 23: Finish Drawing the Waves
Switch to a green gel pen and continue drawing the wave pattern on the bottom of the painting.

STEP 24: Add the Lovebirds
Add two lovebirds using a bird stamp. This clear stamp is great for positioning the birds because you can see exactly where they’ll go in your painting.

STEP 25: Paint the Lovebirds
I used a green and blue ombré ink pad to get the two tones for the birds. You can always hand-paint the birds, too, if you don’t have a stamp. Phthalo Blue and Phthalo Green would achieve the same color effect.

STEP 26: Draw a Heart on the Mast
Draw a little heart in black paint marker at the top of the mast.

STEP 27: Add a Gold Heart Shape
Punch out a gold heart and glue it into the mast to imply that this sailor has a “heart of gold.”

STEP 28: Embellish the Compass
Use a red paint marker to write “L.O.V.E.” over the directional letters in the compass.
STEP 29: Frame the Boat
Frame the boat in a vignette by applying more Light Blue Violet mixed with a touch of clear acrylic gloss medium with a 1" (25mm) flat.

STEP 30: Add Stars to the Sky
Add a few stars to the sky with a white paint marker.

Tell the Story
What story does this boat tell? How do the various collage elements like the compass, birds and different papers you chose work together to enhance the “love” theme? How would the collage be different if your motif was “friendship” or “luck”? For fun, try another collage using a new motif.

THE EXPLORER
Acrylic and mixed media on canvas
40" × 24" (102cm × 61cm)
This painting also uses many motifs to convey the theme of a young girl’s journey through life. The compass, map of Los Angeles, torn paper mountains, diving bell and ruby slippers all highlight the theme of exploration.