CHAPTER 8
TOOLS
It is sometimes said that the tool is the soul of the Japanese carpenter just as the sword was the soul of the samurai. The comparison is apt in many respects. To be more specific, the tool is the means by which the carpenter leaves a trace of his spirit on the soul of the tree, the medium through which a marriage of souls is brought about. As a result, carpenter and tool serve each other, and together they serve the tree. There are regular occasions, such as at New Year, when the carpenter expresses his gratitude for the service his tools have rendered. Offerings of sake and rice cakes are made, and the carpenter promises, despite the great abuse his tools have endured, to treat them with greater respect in the future.
During the Asuka period, when the first Japanese Buddhist temples were built, only four types of carpentry tools were in use: curved bladed chisels, axes, adzes, and “spear planes” (yariganna). Today, an accomplished carpenter possesses a few dozen chisels, a dozen or so saws, a similar number of planes, a couple of axes and adzes, four or five hammers, eight or nine layout and marking tools, several sharpening stones, and assorted other tools. In addition, the modern carpenter has at his disposal a variety of power tools: saws, drills, planers, mortisers, screwdrivers, wrenches, and so on. Nevertheless, the hand tools remain essential to his work, and in all cases they reflect a preindustrial way of thinking about wood and steel carried to the extremes of refinement and subtlety.

Figure 72 Master Nishioka setting out his yariganna (spear planes).

Figure 73 Layout and marking tools. Top: One large and two small marking gauges. Lower left: Three inkpots with line and bamboo marking pens. Lower right: Two steel adjustable bevel gauges, a small square, and a regular square.
Since the heart of a tool lies in its steel, preindustrial tool-making, like swordmaking, necessitated a time-consuming process of lamination of hard and soft steels to create the required characteristics of rigidity and resiliency, which are not unlike the characteristics of wood. Often this affinity between steel and wood is emphasized in the design of the tool, where the laminations stand out in a pattern reminiscent of wood grain.
“Modern steel is no good,” Nishioka said.
“Swordmakers have always tried to find antique steel to use. A
famous swordmaker ... once told me that good tools could probably
be made out of nails from Hōryūji.... I had a plane blade made from
some, and used it on the reconstruction of the Hōryūji Golden Hall”
(Tsunekazu Nishioka, Ki ni Manabe, Tokyo:
Shōgakkan, 1988, pp. 26–7). According to Nishioka, the ancient
steels were produced from rich ore smelted at relatively low
temperatures, resulting in a resilient metal that cannot be
reproduced from the depleted ore available today.
MARKING TOOLS
Steel squares, which are available in
both metric and traditional Japanese measurement scales, are
thinner and more flexible than those generally used in the West,
and they include markings to enable complex calculations to be done
easily onsite (Fig. 73).
Adjustable bevel squares were introduced from the West in the
modern era, but were modified to suit the Japanese preference for
thinner, all-steel tools. The inkpot and line, similar in function
to a Western chalk line, is equipped with a reservoir filled with
ink-soaked cotton for inking the line and dipping a bamboo marking
pen into. The line, after being secured to one end of the piece to
be marked, is drawn tautly through the ink and flicked onto the
wood, leaving a crisp ink line. These inkpots can be very ornate,
and are sometimes carved with a miniature turtle (a symbol of
longevity). Traditionally made of wood, the more common versions
are now of plastic. The most frequently used ink colors are black
and red. Adjustable marking gauges, available in many sizes, are
used to inscribe lines at a set distance from the edge of a board.
Some versions can scribe two or more lines. All consist of a
rounded piece that fits in the palm and is slid along the edge of
the piece to be marked. Through this rounded piece slides a wooden
arm with a small steel scribing blade at one end. The arm is held
in place by a small wooden wedge that is adjusted by tapping with a
mallet.
AXES AND ADZES
Axes and adzes, which come in several sizes, are used for quickly removing large quantities of wood. In trained hands they can do extremely fine work (Figs. 74-76). All have a wooden handle fitted to a socket in the laminated steel blade. Proper operation of the adze requires a handle that is curved to fit perfectly the individual user’s body and places the cutting edge at the optimum angle. Bending the adze stock to the proper angle is a small art in itself, accomplished with the help of water and sunlight. A perfectly curved stock assures flawless performance.

Figure 74 Axes and adzes. From left: Two small axes and three adzes.

Figure 75 Axes, like this one, are high-grade, hand-forged tools for precise carpentry work.
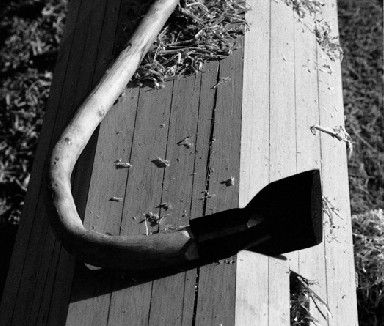
Figure 76 The curved handle of this adze (chona) was made by its owner to suit his own body.
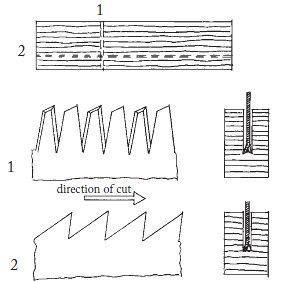
Figure 77 Saws. 1. Crosscut: The teeth have three distinct cutting surfaces (slightly different for hard-wood and softwood). 2. Ripping: Similar to the Western ripsaw (tooth angle slightly different for hardwood and softwood).
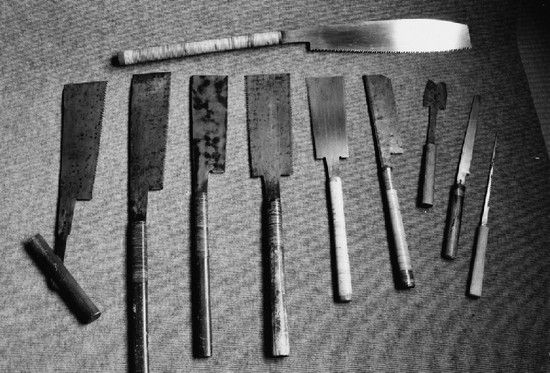
Figure 78 Saws. Top: Crosscut saw for rough work. Bottom, from left: Ripsaw for rough work; two single-edged crosscut saws; two double-edged saws for both ripping and crosscutting; extra-fine crosscut saw for cutting tenons; curved double-edged saw for starting at the middle of a board; two “keyhole” saws.
SAWS
From the hefty ones wielded by
lumberjacks to the tiny ones employed for detailed work in such
tight places as the inside of wooden plane blocks, saws come in
numerous sizes (Fig. 78). The two
main types, crosscut and ripping, are distinguished by the shape of
their teeth (Fig. 77). All of
them cut on the pull stroke, which allows the blades to be
relatively thin (since steel is strongest in tension) and places a
smaller physical burden on the carpenter. As with all good Japanese
tools, the best blades (and many of medium quality) are still made
by hand. Wooden handles and other fittings can be purchased, though
they are preferably fashioned by the user to suit his own taste.
Observed Nishioka, “Maybe Westerners think the added accuracy
[provided by the thin blade of a Japanese saw] doesn’t make any
difference.... But then, an electric saw can cut pretty well, too,
you know. It doesn’t care if the wood is soft or hard!”
CHISELS
There are several varieties of chisel, distinguished primarily by their cross-section and the length of the blade, and by whether the chisel is designed to be struck with a mallet or pushed by hand (Fig. 79). Ranging in width from a few millimeters to about five centimeters, blades are attached to the wooden handle by a thick tang. Two different steels are laminated to form the blade, a harder one for the actual cutting edge and a softer, more flexible type for the back (Fig. 80). The resultant blade holds a polished edge well and resists cracking under stress.
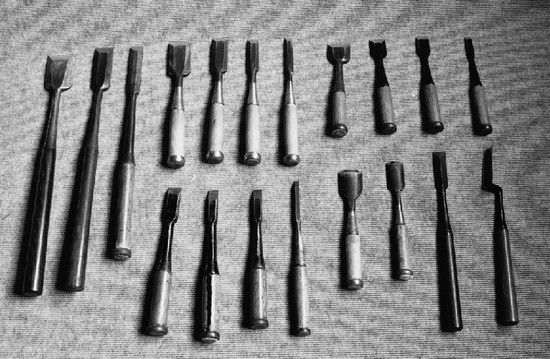
Figure 79 Chisels. Top row, from left: Two paring chisels or slicks; 200-year-old long-handled chisel; four butt chisels; two short butt chisels; two thin chisels. Bottom row, from left: Four mortise chisels; two round chisels or gouges; long-handled detail or dovetail chisel; crooked or trowel chisel.
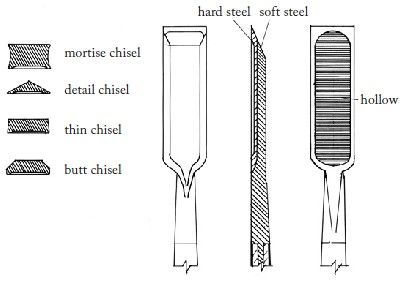
Figure 80 Chisels: Many sizes and shapes are made for specialized uses. They are laminated of hard and soft steel.
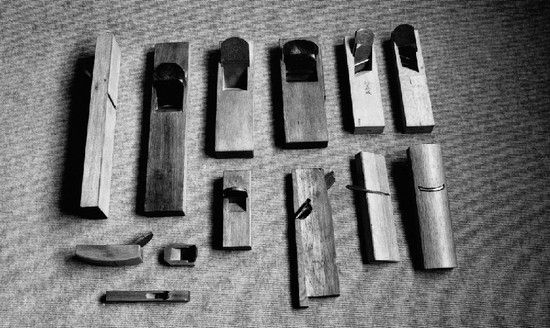
Figure 81 Planes. Top row, from left: Two long “common” planes; two short “common” planes; right- and left-hand corner planes. Bottom row, from left: Miniature compass plane; miniature rounding plane; miniature blunt-nosed plane; scraping plane; plow plane; pointed side-shaving plane; rounding plane.
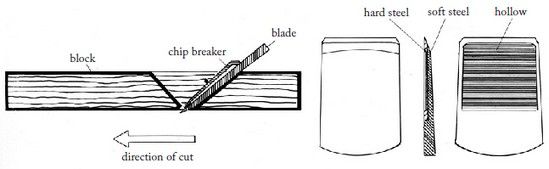
Figure 82 Despite their wide variety, Japanese hand planes are essentially a laminated blade set in a wooden block.
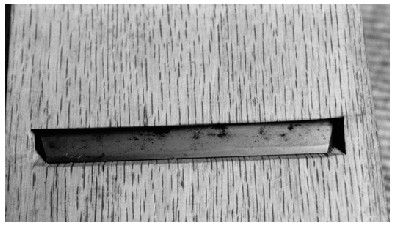
Figure 83 Detail of the sole of a plane, showing the “mouth” and protruding blade.
PLANES
Like Japanese saws, Japanese planes (Fig. 81) work on the pull stroke. They consist of a laminated steel blade fixed in a wooden body. The “common” planes are of many sizes and proportions as well as details of sole design, depending upon whether they are intended to remove wood quickly or to produce the smoothest surfaces. There are other varieties designed for rabbeting, forming curves, beveling corners, and producing shaped moldings, dadoes, and so on. The smallest is the size of the little finger. A well-tuned plane is capable of removing shavings as thin as ten microns and is probably the most difficult tool to master.
SPEAR PLANES
The “spear plane,” or yariganna (also sometimes translated as “planing knife”), is the ancestor of the present-day block plane, which did not appear in Japan until the sixteenth century. Shaped somewhat like a spear (Figs. 84, 85), it is used in long, gentle, slicing strokes to smooth wooden surfaces, producing a slight undulation that is very soft to the touch. Nishioka revived the spear plane after centuries of disuse in order to recreate the original finish of the wood surface at Hōryūji and Yakushiji. It can now be found all over Japan. “The spear plane and the electric plane are designed to do the same job,” Nishioka observed. “The electric plane removes wood more quickly, but the spear plane, even though it was designed over a thousand years ago, leaves a surface that stays smoother much longer. Because the cut is so clean across the cell walls of the wood, water doesn’t enter and the wood resists mold” (Tsunekazu Nishioka, Ki ni Manabe, Tokyo: Shōgakkan, 1988, p. 30).
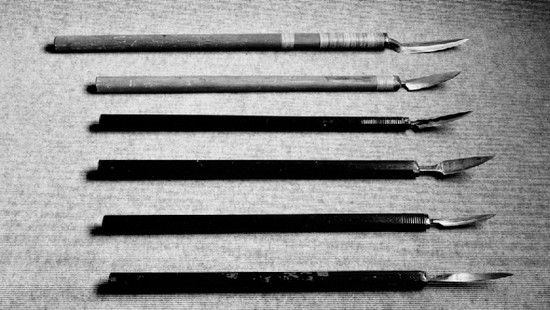
Figure 84 Nishioka’s tool chest contained several kinds of yariganna.
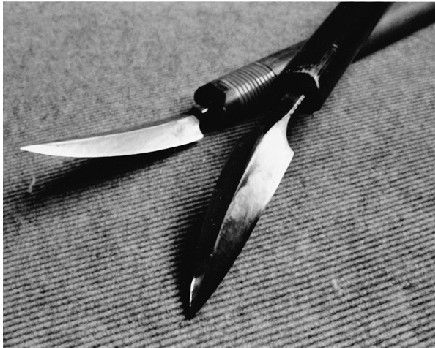
Figure 85 Some yariganna curve upward, some downward, depending on how they are intended to be used.

Figure 86 Hammers. Five types of hammer and a mallet.
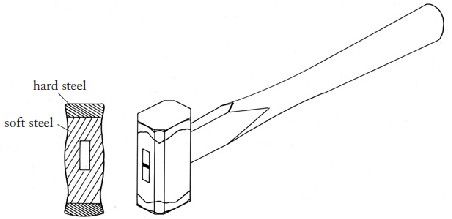
Figure 87 Hammer head. The flat face is used for striking chisels and driving nails, the slightly curved face for sinking nails.
HAMMERS
Hammers are employed primarily for driving chisels and secondarily for driving nails (Fig. 86). Available in several weights and with a variety of head shapes (Fig. 87), they exhibit a number of subtle design features and can be quite decorative. The largest are the sledge hammers for driving spikes and the massive mallets for nudging wooden members into place.
SHARPENING STONES
Sharpening stones (Fig. 88), which are used with water, are found in varying degrees of coarseness. The stone is fitted to a wooden holder. It generally takes three stones of progressively fine grit to true an edge. Occasional resurfacing is done with a powdered abrasive on glass. At the end of the sharpening process, a steel plate is employed to achieve a high polish. In recent years, synthetic stones have become quite common.
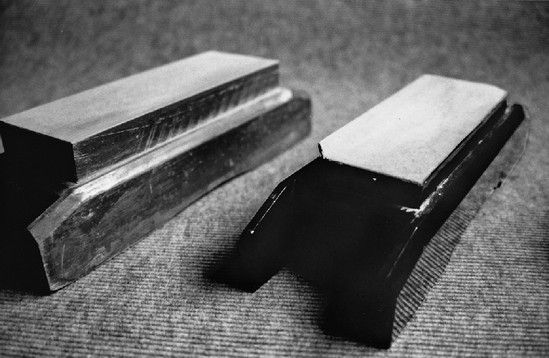
Figure 88 Sharpening stones.