Chapter
19
Cisco Prime Service Catalog Templates
and Provisioning
The following Understanding Cisco Cloud Administration CLDADM (210-455) exam objectives are covered in this chapter:
✓ 3.0 Cloud Provisioning
✓ 3.1 Describe predefined Cisco UCS Director-based services within the Cisco Prime Service Catalog
- 3.1.a Describe the configuration of service names and icons
- 3.1.b Describe order permissions
- 3.1.c Describe template formats
✓ 3.2 Describe provisioning verification
- 3.2.a Describe how to place an order for a service from the Cisco Prime Service Catalog as an end user
- 3.2.b Verify that provisioning is done correctly
- 3.2.c Access VMs and applications that have been provisioned
✓ 3.3 Deploy preconfigured templates and make minor changes to the service catalog offerings that do not affect workflows or services
Prime Service Catalog Introduction
This chapter will focus on Prime Service Catalog and integration with UCS Director and on the templates Prime Service Catalog provides. As explained in the previous chapter, Prime Service Catalog (PSC) makes it easy for to order services and create service catalogs. UCS Director standard and advanced catalogs can be imported and spun up as orderable services. As you’ll see in this chapter, there are many templates and predefined settings to assist you in building your portal. Prime Service Catalog is meant to be your one tool for order and life-cycle management with embedded control and governance. These are some of the features:
- Policy-based controls and approvals
- Billing and financial management with pricing, quota, and lease management
- Service life-cycle management and tracking
- Role-based access control (RBAC) and user entitlement
The goal of Prime Service Catalog is to ensure that all users across the enterprise, whether they be end users, application developers, programmers, or IT professionals, have access to a unified portal. This portal gives them full visibility into their orderable products and life cycles, along with built-in tracking for resource management. Let’s look at some of the pieces that make up Prime Service Catalog, starting with the front end.
Prime Service Catalog Showcase
The showcase is what everyone sees as they first log in, as shown in Figure 19.1. This may also be referred to as the service catalog home page. It’s the front page to guide you to features and provide easy access to some common services.
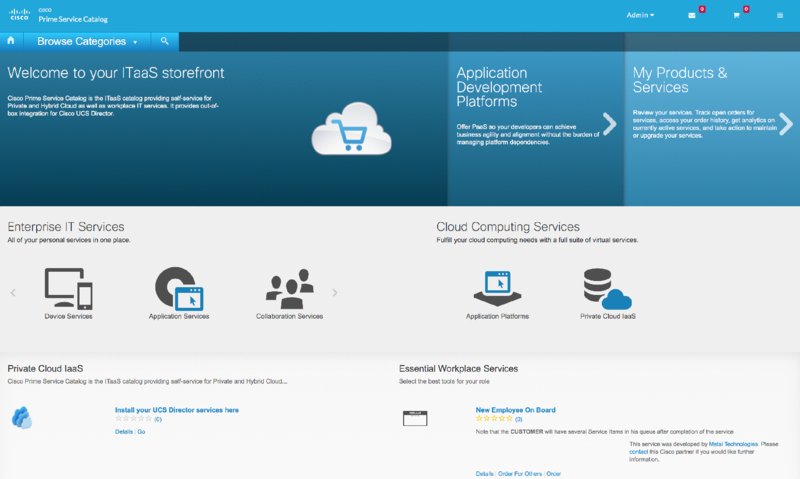
Figure 19.1 Cisco PSC: the showcase
Each of the sections you see can be customized and linked to categories of your choosing, which I’ll discuss in the next section. The following sections are customizable:
- Top (left and center): This section contains the general information and images. It doesn’t have services or categories associated with it to display them. This can be your company welcome image, web links, and more.
- Middle (left and right): This section is for categories and subcategories.
- Bottom (left, middle, and right): This section is for displaying categories and their list of services.
- Browse Categories: Shown on the upper left, this a drop-down menu that you can use to browse categories.
Figure 19.2 shows the drop-down list found under Service Designer where all of the previously mentioned elements can be customized.

Figure 19.2 Customizing the showcase
Categories
Categories are for organizing services for ordering purposes and displaying on the front page, the showcase. Essentially, categories enable customers to find a service that meets their requirements. The category model is completely user defined. A single service can be assigned with multiple categories. The Service Designer module assists with creating categories, as shown in Figure 19.3. There are many things you can do in the designer, including create your own custom descriptions, names, and images. You’ll want to pick what is most relevant to your end users, and you have a lot of flexibility in how these categories are presented.
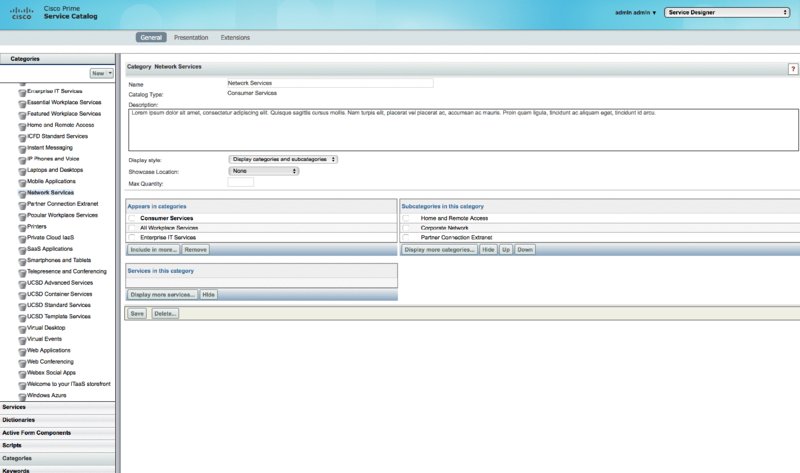
Figure 19.3 Cisco PSC: categories
Figure 19.3 is just an example; there are many prebuilt categories for you to modify out of the box. The designer has a presentation page to add custom images, the category location, and custom HTML. You can see an example of this in Figure 19.4.

Figure 19.4 Cisco PSC: categories and presentation
I’ll return to categories when I show how services are ordered. Keeping your services in logical categories will greatly benefit your end users when it comes time to finding an orderable service.
Services
Prime Service Catalog services are the actual objects that do things. Referencing Figure 19.3, you’ll see that the categories are an organizational structure that hold services. Figure 19.5 shows one of the service windows from the BYOD category.

Figure 19.5 Cisco PSC: BYOD services
Prime Service Catalog has an extremely powerful service designer that can deliver just about anything your organization may need. The first CCNA cloud exam, CLDFND 210-451, doesn’t go into Prime Service Catalog deeply, so we won’t cover it at length here, but you need to understand the difference between Prime Service Catalog services and the UCS Director catalogs. As previously discussed, Prime Service Catalog works directly with UCS Director and can import catalog and services right from UCS Director. I’ll discuss this in later sections and show how to work with the integrations.
Importing to Prime Service Catalog
Now we’ll move on to showing how to integrate UCS Director into Prime Service Catalog. You can use the built-in workflows and catalogs from UCS Director to populate orderable services in Prime Service Catalog. Here’s how to do it:
- Log in to Prime Service Catalog and click the upper-right corner menu icon to find the advanced service configurations and integrations, as shown in Figure 19.6.
- Click Integrations, and you should see Figure 19.7.
- Choose the UCS Director Integration and then fill out the fields for your UCS Director instances. The Identifier field is used within Prime Service Catalog to refer to separate external connections, as there can be more than one. You can choose HTTP/HTTPS here and also copy your root CA certificate for UCS Director. If you don’t copy the certificate, you can optionally skip the validation step. Figure 19.8 shows the integration fields.
- After you’ve filled out your fields and clicked Next, you can navigate up to Manage Integration and click Test Connectivity.
- After your connectivity test passes, you can import all the objects. This button is right above the test button shown in Figure 19.9. This may take some time depending on how many objects you have.
- After discovery has finished, you can scroll down and
see the imported objects and services from UCS Director. Note that
the identifier field is the name used in Figure 19.8. This can be useful to determine
where an object was imported from, so name your fields
appropriately.
As you can see in Figure 19.10, we imported several standard catalog VMs from UCS Director. There are even more objects that can be scrolled through depending on what is currently configured in your UCS Director version. My instance has many workflows and other objects, as shown in Figure 19.11. - The next step is to enable the UCS Director agent and scheduler. You can find the agent under Advanced ➢ Service Link on the main page, as shown in Figure 19.12.
- Click Control Agents, choose the UCSD agent, and start it, as shown in Figure 19.13.
- Using the drop-down menu in the upper-right corner, select Administration, as displayed in Figure 19.14, and then click Settings in the upper bar.
- Under Common you’ll find the UCSD scheduler that is set to Off by default. Toggle it On and click Update at the bottom of the page.

Figure 19.6 Cisco PSC: integrations

Figure 19.7 Cisco PSC: new integration
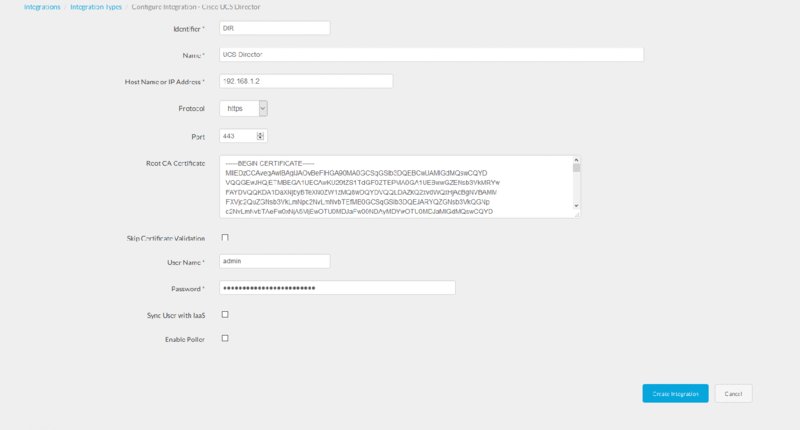
Figure 19.8 Cisco PSC: integration fields

Figure 19.9 Cisco PSC: test integration

Figure 19.10 Cisco PSC: imported services
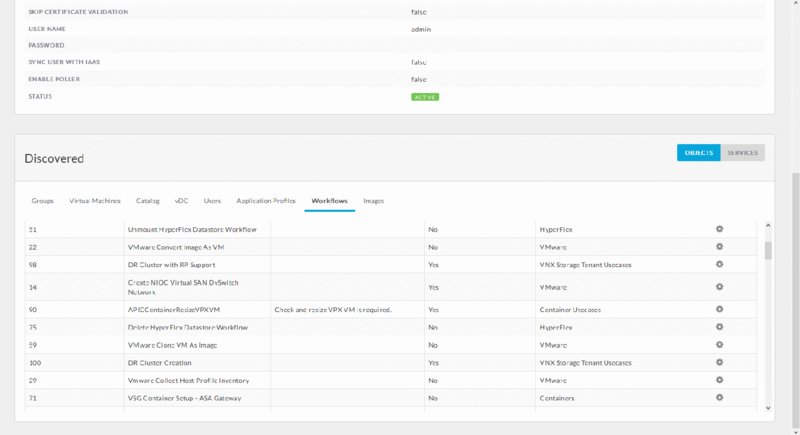
Figure 19.11 Cisco PSC: imported workflows

Figure 19.12 Cisco PSC: Service Link
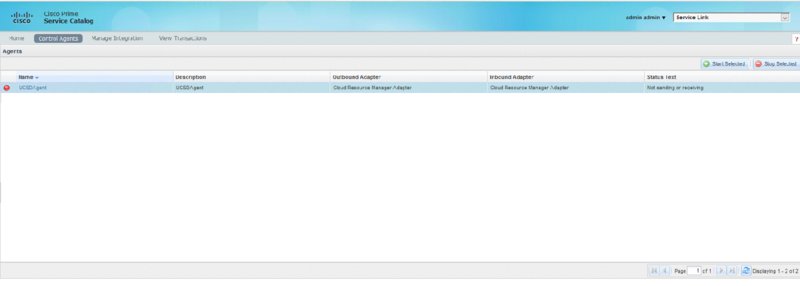
Figure 19.13 Cisco PSC: UCSDAgent

Figure 19.14 Cisco PSC: Administration
You’ve now imported all the catalogs and workflows from UCS Director into Prime Service Catalog. They’ve also been added to your front store, which can be customized to your needs. You’ll want to do this because the default icons and names may not be easily understandable by end users and customers. You can see this in the Service Designer module, as shown in Figure 19.15.

Figure 19.15 Cisco PSC: Services Designer
Notice the “DIR” identifier again in the name. That’s the short name I used on import. You can change this name to something that has more meaning to your end users. The icon is also blank, so you can click the Presentation tab to change it. There are a lot of built-in images for you to choose, and you can also import your own or point to a URL of an image, as shown in Figure 19.16.

Figure 19.16 Cisco PSC: Presentation options
Figure 19.17 shows the permissions page. These permissions are inherited from the import, and you may not have to do anything if the permissions were set up correctly for your needs in UCS Director. Prime Service Catalog contains several customizations to adjust security in its own RBAC settings. There are many things that are customizable in the service and portal designer that you can explore. I won’t cover them here because they’re beyond the scope of the CCNA CLDADM exam.
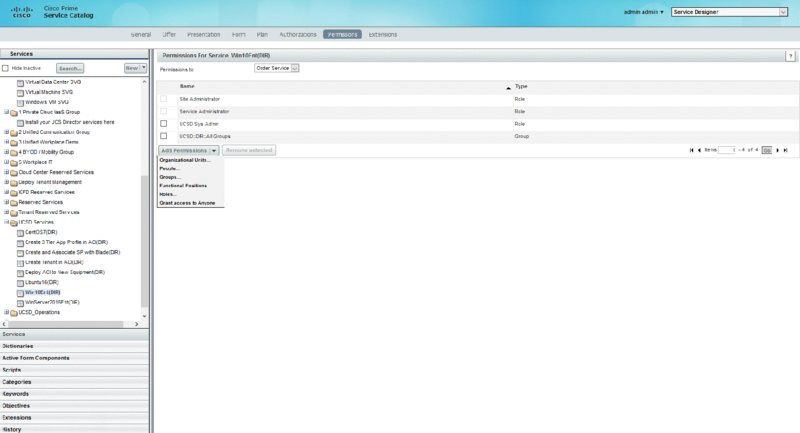
Figure 19.17 Cisco PSC: service permissions
Ordering from Prime Service Catalog
Now let’s put all of this together with how you’d order from the catalog. Remember, when designing your catalog and front end that the goal should be ease of use for your customers. Prime Service Catalog will help you achieve that. The showcase, as explained in the beginning of the chapter, is the first page that end users will see as they log in. Often a shortcut will be here for quick services, and you have full control over how that looks. But what if a user is just browsing?
Finding Services
This is where the categories come into play, as discussed earlier. Look at Figure 19.18 and the Browse Categories shortcut on the showcase.

Figure 19.18 Cisco PSC: Browse Categories
Your end users can use this to browse all of your predefined categories. You have control over this in the service designer. You can bind your services to any category you choose or define your own category with custom icons for your company. In this case, we am showing the standard, out-of-the-box categories. Click Private Cloud IaaS to see the screen in Figure 19.19.

Figure 19.19 Cisco PSC: Private Cloud IaaS category
You’ll notice a few things here. We’ve added some icons to some of the services and not others. This makes it obvious what services stand out and how you can customize yours to your needs. There is one important thing to notice here, which is the “DIR” shortcut in the name from the imported UCS Director services. While this might be a good name for the administrator, it might make finding the service hard for the customer. You can see services here easily because the Browse Categories shortcut shows you everything bound to that category. If you had hundreds of services, though, it would not be that easy to find. You could continue ordering from here, but let’s assume you can’t find it.
Looking at Figure 19.20, you can see that the search icon is right next to the Browse Categories drop-down menu. Some users might prefer this method of search. You need to again be careful of how you design your services and names to make it easy for end users to find services. Figure 19.21 shows the results from a search for windows.
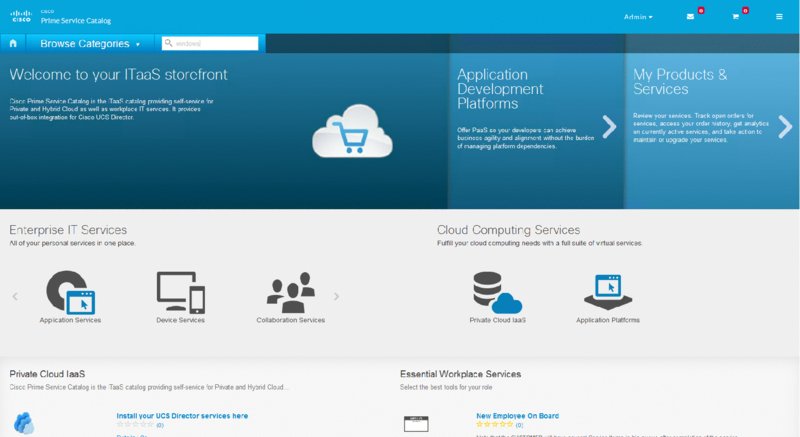
Figure 19.20 Cisco PSC: search

Figure 19.21 Cisco PSC: search results
You see only one result in Figure 19.21, but you know there are more services out there for Windows. The problem is the name. The UCS Director imported services have abbreviated names. In this case, the Win name refers to Windows. When you search for that abbreviation, you see different results, as shown in Figure 19.22.
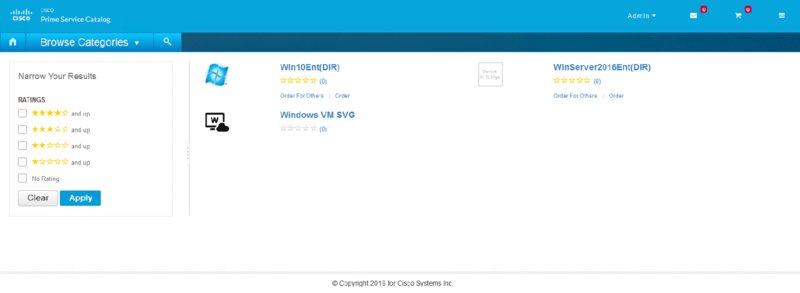
Figure 19.22 Cisco PSC: search continued
This should highlight again the need for clear service names. When search and browsing aren’t enough, you can also stick services directly on the showcase front page. In my example catalog, scrolling down shows the Private Cloud IaaS services. If a user was trying to locate a service in that category, they could browse to it, search for it, or see it on the front of the showcase. All of this is entirely up to you, the administrator.
Ordering and Monitoring
Let’s walk through an order now. There are several places to order services, as previously discussed. The Browse Categories area, search results, and front page of the showcase are the most common. Clicking Order on any of the available services will bring you to a screen with options, as shown in Figure 19.23.
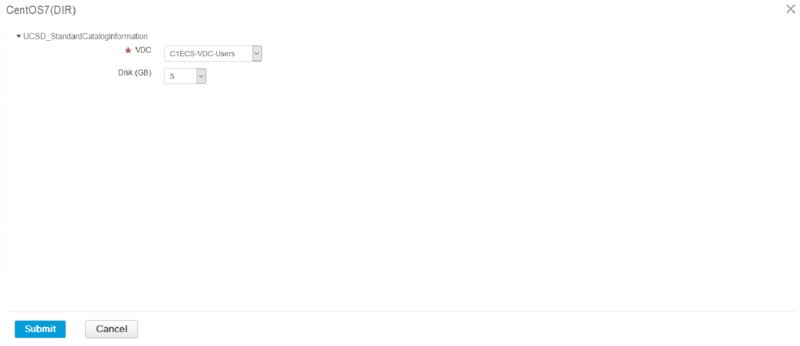
Figure 19.23 Cisco PSC: CentOS7 Ordering
This particular screen is showing options for the CentOS7 imported service from UCS Director. Depending on what you defined as tunable options, they’ll show up here. Picking the VDC and disk size and then hitting Submit takes you to a final screen, as shown in Figure 19.24.

Figure 19.24 Cisco PSC: ordering continued
Under My Products & Services in the upper-right menu, you can click Orders to see the status of your services. This is particularly useful if you’ve ordered a large number of services. In this example, there are a couple here, as shown in Figure 19.25.
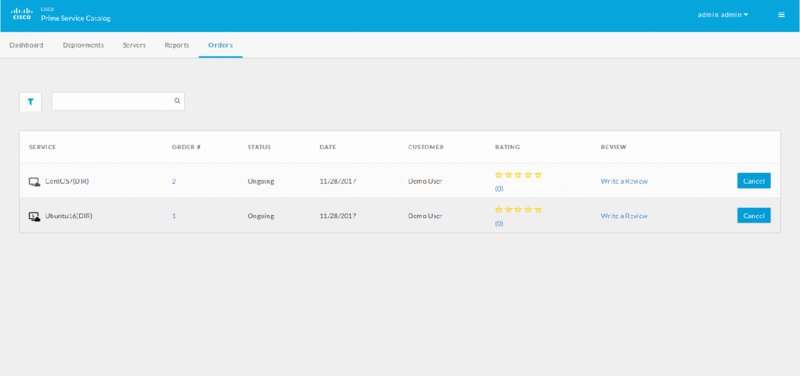
Figure 19.25 Cisco PSC: two services ordered
This example showed an immediate order after hitting Submit. As the administrator, you can specify the use of a shopping cart in the order mode of the service designer. This would typically be used with services that are grouped together and ordered together after all the options are chosen. You can see this option selected in Figure 19.26.

Figure 19.26 Cisco PSC: order mode
Changing the mode to Add Review Enabled, as shown in Figure 19.26, changes how the imported CentOS service is ordered. Now when a user selects this, they will add it to a cart and can check out later after ordering other items. Figure 19.27 shows the difference.
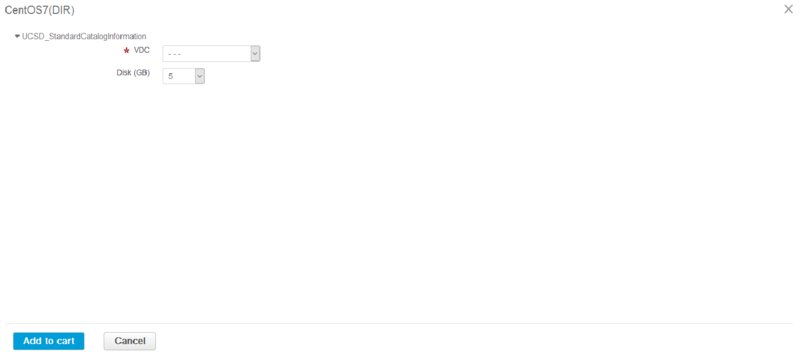
Figure 19.27 Cisco PSC: adding to a cart
After the submission or checkout process, your order will be built, and you will be notified when it is finished. One of the places to look for the status is the notifications menu. This is right next to the shopping cart, as shown in Figure 19.28. You’ll notice the indicators in the upper left corner indicating letting the user know that there are currently three notifications. In this case, they’re for the status that the orders are building.

Figure 19.28 Cisco PSC: notifications
Accessing and Managing Services
After ordering and using the system, you’ll want to know where your dashboard is. On the front page of Prime Service Catalog (or showcase), the far-right side of the screen has a link to My Products & Services. Clicking it shows a dashboard where your end users can keep track of their open orders, charges, servers, and services, as shown in Figure 19.29.
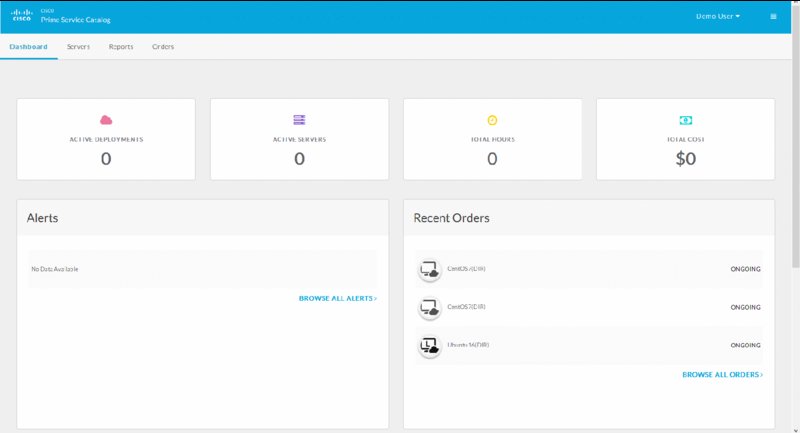
Figure 19.29 Cisco PSC: dashboard
As shown in Figure 19.29, you will be able to see several statistics. Most notably, you’ll see the recent orders, charges, and the number of servers you have deployed. For this example, my orders are still in progress. If you were to click the server’s section, you could access several options to manage your servers. The various options available on the Servers tab are as follows:
- Create VM Disk: This creates another disk for the selected VM.
- Clone VM: This creates a similar VM.
- Create and Delete VM Snapshot: This creates or deletes an existing snapshot.
- Reset VM: This reboots the selected VM.
- Revert VM Snapshot: This chooses a snapshot to revert the VM to.
- Standby VM: Using this option, the processes are stopped, but virtual devices will remain connected.
- Suspend VM: This stops all processes and turns off the VM temporarily.
You can also view resource reports for virtual data centers and reports for cost and service usage. These items aren’t covered in depth on the exam, but it’s important to know that they’re there.
Summary
In this chapter, we discussed Prime Service Catalog and its ability to offer a storefront-like service for your end users. We covered the showcase, categories, and how to find and order services. You learned that Prime Service Catalog is extremely flexible, and nearly everything can be configured with the brand of your company.
We also went through how to import the UCS Director catalog and how permissions are inherited with workflows and services. Finally, you learned how to access and manage your orders and resources via the user dashboard. In the next chapter, you’ll explore some more components of the Prime Service Catalog suite.
Exam Essentials
Know what the showcase is for in Prime Service Catalog. The showcase is the front page or entryway into the services catalog for an end user. It’s the first page they see. Understand that UCS Director and Prime Service Catalog work together and as stand-alone applications. UCS Director has its own end-user storefront. It is not as highly customizable as the one in Prime Service Catalog. Know that Prime Service Catalog is the choice for flexibility and customization of a storefront for cloud services.
Know how to import UCS Director workflows and services to quickly configure Prime Service Catalog. The goal is ease of use in getting a customized storefront up as soon as possible. The ability to import UCS Director workflows makes this process quicker.
Understand how categories relate to Prime Service Catalog and how they’re displayed on the front page. Categories are the basic unit for holding services and orderable items and are highly customizable from icon images to permissions and how they’re invoked.
Know how basic ordering works and the difference between checkout and simple one-click ordering when hitting Submit. Understand how to monitor the order process and where to find your dashboard to check on orders and provisioned services.
Written Lab
The following questions are designed to test your understanding of this chapter’s material. You can find the answers to the questions in Appendix B. For more information on how to obtain additional questions, please see this book’s Introduction.
-
The front page of the Prime Service Catalog is also referred to as _______ _______.
-
The _______ _______ is used within Prime Service Catalog to refer to separate external connections.
-
_______ _______ _______ _______ is where an end user can find dashboards and the status of ongoing orders.
-
Importing from UCS Director can be found in the section called _______.
-
_______ is the term described for organizing services for ordering.
-
The _______ will assist you in creating categories and services.
-
Reset VM is something you could do from what section?
-
The service icon can be customized for orderable services. True/False?
-
Top-Left and Top-Center is a naming convention referring to what part of Prime Service Catalog?
-
Where would a user see an indicator of current order issues or action items?
Review Questions
The following questions are designed to test your understanding of this chapter’s material. You can find the answers to the questions in Appendix A. For more information on how to obtain additional questions, please see this book’s Introduction.
-
What is an organizational unit in Prime Service Catalog?
- Showcase
- Service icon
- Categories
- Intro page
-
Which are sections of the front page of Prime Service Catalog? (Choose all that apply.)
- Bottom-Left
- Shopping cart
- Browse Categories
- Bar
-
What automation platform integrates with Prime Service Catalog?
- UCS Director
- VMware
- KVM
- Universal hypervisor
-
What can be done from the Servers menu portal? (Choose all that apply.)
- Create a VM snapshot.
- Chargeback a team.
- Suspend a VM.
- Clone a VM.
-
What part of the front page could a user use to find a named service?
- Search
- Top-Left
- Start Application
- Shopping cart
-
Where can you find reports on open orders and charges?
- Infrastructure Reports
- The showcase
- My Products & Services
- Advanced Reports
-
To change what category a service appears in, you would use what?
- Presentation
- Policies
- Map reports
- Settings
-
A service icon image can be loaded from which of the following?
- A URL location
- The shopping cart
- A custom container
- None of the above
-
Where would you look to see what services you are about to order?
- Review page
- Shopping cart
- Billing module
- Rent agreement
-
You can set service permissions from where in Prime Services Catalog?
- Service designer
- Dashboard
- Presentation
- End-user portal
-
When integrating with UCS Director, how must the root CA must be configured? (Choose all that apply.)
- Skip validation and not be used
- Used, imported
- Variable
- None of the above
-
Where can you change a service from being an immediate order to just going in the shopping cart?
- Ordering mode in the service designer
- Presentation in Services
- Order Type in General
- Billing Type in Presentation
-
What is the Identifier field used for in an integration?
- A nickname for reference
- For automation
- For service design
- For the showcase
-
Browse Categories is part of what?
- The showcase
- The service designer
- The portal designer
- Multi-Domain Manager
-
Cloning a VM could be done from where in Prime Service Catalog as an end user?
- Service container catalog
- Operations area
- Standard area
- Server area under My Products & Services
-
Browse Categories lets you do what?
- Browse through all services under a category.
- Publish to end users.
- Report on services.
- Order infrastructure services.
-
Integrations under the main menu let you do what? (Choose all that apply.)
- Integrate with VMware.
- Integrate with UCS Director.
- Integrate with KVM.
- Integrate with UCS Performance Manager.
-
Where would a user be told of a pending order in the showcase?
- Portal menu
- Service portal
- Notifications menu
- None of the above
-
How many customizable areas are on the showcase?
- 5
- 3
- 7
- 8
-
The identifier field during integration is required and configured during what part of integration?
- Configured on import from UCS Director
- Never, it is not needed after import editors discretion.
- Configured on Export from UCS Director
- None of the above