5.3 The Perch Sensor
Bird feeders come in different shapes and sizes. I opted to go with a low-tech solution for determining when a bird lands on the feeder perch. While it is certainly possible to construct an elaborate pressure switch mechanism, the time and expense required to implement it seems like a lot of work just to detect when something grips the perch. Instead, we can monitor fluctuations in electrical capacitance.
Cover the feeder perch with aluminum foil, attach a wire from the foil to a resistor connected to the digital pins on the Arduino. By measuring baseline values and fluctuations detected when a bird lands on this sensor, we can establish a threshold value to determine when a landing message should be transmitted.
Building the Sensor
Building and testing the perch sensor is the easiest part of this project. Take a piece of aluminum foil, flatten it to half the size of a gum stick wrapper, and wrap it across the bird perch. Then take a 10M ohm resistor and insert one end into the Arduino’s digital pin 7 and the other end in digital pin 10. Then connect a wire from the foil to the resistor lead that is connected to the Arduino’s digital pin 7. For the wiring diagram, refer to Figure 12, Wiring up a capacitive sensor.
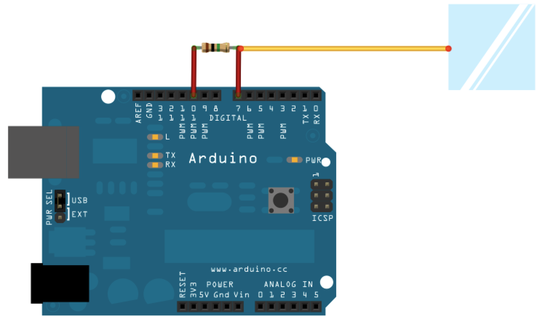
Figure 12. Wiring up a capacitive sensor
Programming the Sensor
Connect the Arduino to your computer and fire up the Arduino IDE to write the sensing code. Like the Water Level Notifier project, we will write code that we will use to do the following:
-
Display the capacitive sensor’s electrical values to the Arduino IDE’s serial monitor window.
-
Identify the baseline electrical value of the sensor.
-
Alter the flow of current when placing a finger on the sensor.
-
Record the new value to use for our alert trigger condition.
In order to more easily and programmatically detect the electrical changes that occur when something like a finger or a bird lands on the foil, we will call upon the help of Arduino enthusiast Paul Badger. Paul wrote an Arduino library that makes measuring changes in capacitive sensors like the foil one we constructed for this project a breeze. Called the Capacitive Sensing library,[46] the library gives Arduino programmers the ability to turn two or more Arduino pins into a capacitive sensor that can be used to sense the electrical capacitance of a body. A human body is considerably larger than a bird and will therefore create a much larger deflected value. Nevertheless, a bird also has measurable electrical capacitance, and that is the threshold value we will attempt to refine in our program.
Download this library, uncompress its contents, and
copy it into your Arduino’slibraries folder. For more details, refer to
Appendix 1, Installing Arduino
Libraries.
Create a new Arduino project and use the
# include CapSense.h;.
Due to the difference in size and surface area touching the foil, a bird will have a very different value than that of a person. If possible, measure the value difference with a bird. Fortunately my kids have pet parakeets, and these birds were all too eager to be test subjects in exchange for the seed supplied by the feeder. My test measurements concluded that the baseline value varied between 900 and 1400, and the bird’s capacitance increased that value to more than 1500. Using these values, we can use the same type of conditional code from the Water Level Notifier project to raise and reset the bird landing and departure notifications.
We will write the code that will load the CapSense library and capture and display the capacitive values to the serial monitor window.
| TweetingBirdFeeder/BirdPerchTest.pde | |
#include
<CapSense.h> |
|
|
|
#define
ON_PERCH 1500 |
|
#define
CAP_SENSE 30 |
|
#define
ONBOARD_LED 13 |
|
|
|
CapSense
foil_sensor = CapSense(10,7); // capacitive
sensor |
|
// resistor bridging digital pins 10 and
7, |
|
// wire attached to pin 7 side of
resistor |
|
int
perch_value = 0; |
|
byte
perch_state = 0; |
|
|
|
void
setup() |
|
{ |
|
// for serial window
debugging |
|
Serial.begin(9600); |
|
|
|
// set pin for onboard led |
|
pinMode(ONBOARD_LED, OUTPUT); |
|
} |
|
|
|
void
SendPerchAlert(int perch_value,
int perch_state) |
|
{ |
|
digitalWrite(ONBOARD_LED, perch_state ? HIGH : LOW); |
|
if (perch_state) |
|
Serial.print("Perch arrival event,
perch_value="); |
|
else |
|
Serial.print("Perch departure event,
perch_value="); |
|
Serial.println(perch_value); |
|
} |
|
|
|
void
loop() { |
|
// wait a second each loop
iteration |
|
delay(1000); |
|
|
|
// poll foil perch value |
|
perch_value = foil_sensor.capSense(CAP_SENSE); |
|
|
|
switch (perch_state) |
|
{ |
|
case 0: // no
bird currently on the perch |
|
if (perch_value >=
ON_PERCH) |
|
{ |
|
perch_state = 1; |
|
SendPerchAlert(perch_value, perch_state); |
|
} |
|
break; |
|
|
|
case 1: // bird
currently on the perch |
|
if (perch_value <
ON_PERCH) |
|
{ |
|
perch_state = 0; |
|
SendPerchAlert(perch_value, perch_state); |
|
} |
|
break; |
|
} |
|
} |
|
Note the defined ON_PERCH
value of 1500 to compare against the recorded perch_value. Due to variations in the conductivity
and surface area of your foil sensor, you may need to tweak the
ON_PERCH threshold value just like you
did for the Water Level Notifier project so that it works best for
your configuration. Also note the value of 30 assigned to the
CAP_SENSE constant. This is the number
of samples to poll during the capacitive measurement cycle.
Now that we have a working bird perch sensor, we need a way for the feeder to alert us when it is running low on seed. How will we do this? A photocell can help.