9.5 Writing the Android Client
Writing code for the Android client to send unlock commands to the Android server is easy. Let’s reuse code from the Web Enabled Light Switch Android client application to provide easy user access to the door latch function. This time, we will use a button instead of a toggle switch since we already programmed the lock to unlock for five seconds. This makes the toggle unnecessary. Another feature we will add to this application is to turn on the Wi-Fi radio if it isn’t already active.
The basic flow of the program will be to launch it and check for Wi-Fi access. If the Wi-Fi radio is turned off, turn it on and wait for the client to connect to the network. Allow the user to press the displayed Unlock Door button, which will access the Android Door Lock server URL and unlock the door. Briefly, here are the steps we will take to code the unlock client:
-
Create an Android project in Eclipse called DoorLockClient.
-
Check if the Wi-Fi radio is on in the program’s main activity. If Wi-Fi is turned off, activate it.
-
Add a Button to the main.xml layout description and label it “Unlock Door.”
-
Reference the button in the DoorLock class and a listener for the button press event. If the Wi-Fi radio is being turned on for the first time when the program starts, keep the Unlock Door button disabled for a few seconds to allow the Wi-Fi interface to authenticate with the wireless access point and establish the client’s IP address.
-
Add the URL request call in the button press event to the Android Door Lock server (ex: 192.168.1.230).
We will start by following the same procedure used in Section 7.6, Writing the Code for the Android Client. Create a new Android project in Eclipse using the parameters shown in Figure 42, Settings for the new Door Lock Client application.
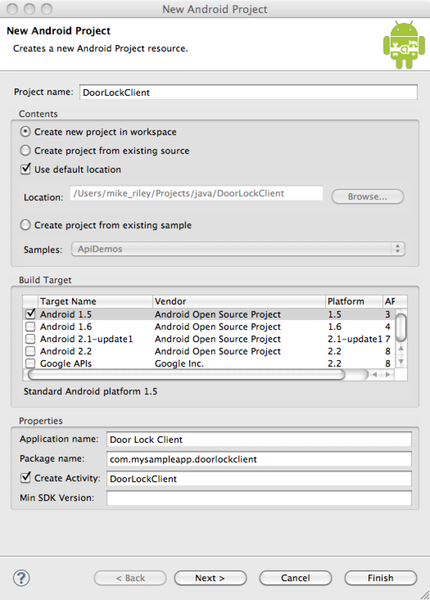
Figure 42. Settings for the new Door Lock Client application
Add a button called unlockbutton, label its text “Unlock Door,” and set
the button’s width to fill the LinearLayout of the parent
container. The main.xml file
should look like this:
<?xml version="1.0" encoding="utf-8"?> |
|
<LinearLayout xmlns:android="http://schemas.android.com/apk/res/android" |
|
android:orientation="vertical" |
|
android:layout_width="fill_parent"
android:layout_height="fill_parent"
> |
|
<Button android:id="@+id/unlockbutton" android:layout_height="wrap_content" |
|
android:text="Unlock Door"
android:layout_width="fill_parent"
> </Button> |
|
</LinearLayout> |
Save the changes. Open the DoorLockClient.java file and add references
for the unlockbutton Button element and
its event listener. Also add Wi-Fi radio detection and activation.
The full listing for the DoorLockClient.java class should look like
this:
| AndroidDoorLock/DoorLockClient/src/com/mysampleapp/doorlockclient/DoorLockClient.java | |
package
com.mysampleapp.doorlockclient; |
|
|
|
| ① | import
java.io.InputStream; |
import
java.net.URL; |
|
import
android.net.wifi.WifiManager; |
|
import
android.widget.Button; |
|
import
android.app.Activity; |
|
import
android.os.Bundle; |
|
import
android.util.Log; |
|
import
android.view.View; |
|
|
|
public
class DoorLockClient extends Activity { |
|
/** Called when the activity is first created.
*/ |
|
@Override |
|
public void onCreate(Bundle savedInstanceState)
{ |
|
super.onCreate(savedInstanceState); |
|
setContentView(R.layout.main); |
|
| ② |
Button unlockbutton =
(Button)
findViewById(R.id.unlockbutton); |
findViewById(R.id.unlockbutton).setOnClickListener |
|
(mClickListenerUnlockButton); |
|
try { |
|
WifiManager wm = |
|
| ③ |
(WifiManager) getSystemService(WIFI_SERVICE); |
if (!wm.isWifiEnabled())
{ |
|
unlockbutton.setEnabled(false); |
|
wm.setWifiEnabled(true); |
|
// Wait 17 seconds for Wi-Fi to turn on and
connect |
|
Thread.sleep(17000); |
|
unlockbutton.setEnabled(true); |
|
} |
|
}
catch (Exception e) { |
|
Log.e("LightSwitchClient", "Error: " + e.getMessage(), e); |
|
} |
|
|
|
} |
|
View.OnClickListener
mClickListenerUnlockButton = |
|
| ④ |
new View.OnClickListener() { |
public void onClick(View
v) { |
|
try { |
|
final InputStream is = |
|
| ⑤ |
new URL("http://192.168.1.230:8000").openStream();
|
} |
|
catch (Exception e) { |
|
} |
|
} |
|
}; |
|
} |
|
- ①
-
Import the library references for
java.io.InputStream,java.net.URLand Android-specificandroid.widget.Buttonandandroid.net.wifi.WifiManager. - ②
-
Add a reference for the
unlockbuttonButton and assign it to themClickListenerUnlockButtonView method. - ③
-
Query the state of the Wi-Fi radio, and if it’s not active, turn the Wi-Fi radio on. Keep the
unlockbuttondisabled for seventeen seconds to allow enough time for the network connection to initialize. - ④
-
Create the
View.OnClickListenerfor theunlockbutton. - ⑤
-
Request the Android door lock server address when the
unlockbuttonis clicked.
We have one more task to complete before we can test
out the application. Remember how we had to set permission to
access the network for the Web Enabled Light Switch Android client?
We have to do the same thing for this Door Lock Client. We also
have to grant permission to access the state of the Wi-Fi radio as
well. These permissions are noted in the AndroidManifest.xml file, which should look
like this once these two permissions are added:
<?xml
version="1.0" encoding="utf-8"?> |
|
<manifest xmlns:android="http://schemas.android.com/apk/res/android" |
|
package="com.mysampleapp.doorlockclient" |
|
android:versionCode="1" |
|
android:versionName="1.0" > |
|
<uses-permission
android:name="android.permission.INTERNET"
/> |
|
<uses-permission
android:name="android.permission.ACCESS_WIFI_STATE" /> |
|
<uses-permission
android:name="android.permission.CHANGE_WIFI_STATE" /> |
|
|
|
<application
android:icon="@drawable/icon"
android:label="@string/app_name"
> |
|
<activity
android:name=".DoorLockClient" |
|
android:label="@string/app_name"
> |
|
<intent-filter> |
|
<action android:name="android.intent.action.MAIN" /> |
|
<category
android:name="android.intent.category.LAUNCHER"
/> |
|
</intent-filter> |
|
</activity> |
|
</application> |
|
</manifest> |
Save the project and test it using an available Android phone. First test its operation with the Wi-Fi radio turned on. The button should be instantly accessible after the program has launched. Quit the program, preferably using a task manager (i.e., make sure the running instance of the program is destroyed and not running silently in the background). Next, turn off the Wi-Fi radio and launch the Door Lock Client application again. This time, the Unlock Door button will be disabled while the program turns on the Wi-Fi radio and waits until a connection with the network has been established. If the radio turned on, you’re ready for a live test with the door lock server.
Click the Unlock Door button. Within a second or two, the electric lock should click open and then close approximately five seconds later. If it did, congratulations on a job well done! If it didn’t, verify that your Android device is indeed connected to the network. Test the URL access via the Android web browser. If you can’t access the URL, make sure the Android door lock server is still set to the static IP we defined earlier and that it is running. Try accessing the URL from a different system just to verify that the rest of your home network can access the Android door lock server.