7.3 Hooking It Up
Plug the X10 CM11A into an outlet near your computer so that its interface cable is within reach of your computer. Because the CM11A uses a 9-pin serial connection, you will need a USB-to-serial adapter and the appropriate driver, similar to the illustration shown in Figure 23, The X10 CM11A interface controls the Web-Enabled Light Switch. If you use a Mac running OS version 10.6 or higher, you can download the PL-2303 driver from the Prolific website.[71] Computers running the latest Linux distributions should have no trouble identifying and connecting to the PL-2303 interface.
Next, plug the USB-to-serial adapter into a USB port
on your computer and attach it to a powered CM11A interface. You’ll
need to interrogate the device for the serial port that the
operating system assigned to the interface. You can do this via
locating the appropriate tty device file
in the /dev directory by issuing a
ls /dev/tty* command in the terminal
window. Easier still, load up the Arduino IDE and select the
Tools→Serial Port menu option. In my
case, the device name of the CM11A is /dev/tty.usbserial, as shown in Figure 24,
The Arduino
Tools menu displaying the USB serial adapter name. Note
the name of the new device path since you will need to refer to it
in the Heyu configuration file.
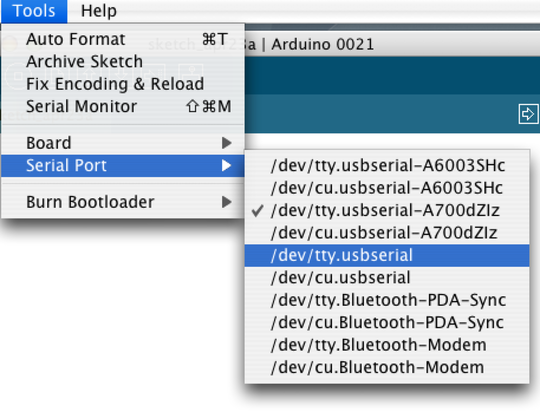
Figure 24. The Arduino Tools menu displaying the USB serial adapter name
Now that the CM11A is connected to and recognized by
your computer, download the Heyu source code from the Heyu.org
website, uncompress the tarball via the tar
-zxvf heyu-2.9.3.tar.gz command. Then, perform a
./Configure;make;make install
cycle to install the compiled application. If you use a Mac, you
need to have the Mac developer tools installed before
proceeding.[72]
If you are using a Linux computer, make sure you have the necessary
gcc compile and make tools installed. For example, if you are using
a Debian-based Linux distribution like Ubuntu, issue sudo apt-get install build-essential from
the terminal window to download and install the compiler and linker
tools. Then, execute the usual ./Configure, make, and sudo
make install to compile the source and install the
heyu executable and
dependencies on your computer.
Along with the heyu executable, a x10.conf configuration file is installed in
the /etc/heyu directory. Open this
file for read-write editing (ex: sudo
vi /etc/heyu/x10.conf).
There are a number of options that can be set in the
x10.conf file, but the one we’re
most concerned with now is the serial port path to the CM11A that
you identified earlier.
# Serial
port to which the CM11a is connected. Default is
/dev/ttyS0. |
|
TTY
/dev/tty.usbserial |
Use your favorite text editor to enter the serial port value that matches the location of your CM11A device. Save the file and test the settings by first launching the Heyu state engine via a terminal window with the command:
>
heyu engine |
If no errors are reported, you’re in good shape
since the engine daemon found the device and is running
successfully in the background. You can also try entering
heyu info for more details about the
Heyu configuration. Now, in the same terminal enter this:
>
heyu monitor |
This will monitor the interaction of the CM11A with
other X10 devices. Assuming you have set the housecode of the PLW01
wall switch to H3, enter this
command:
>
heyu on h3 |
That should turn on the switch and complete the circuit for whatever electrical device (such as a ceiling lamp) it is routing electricity to. You should also see the terminal window running the Heyu monitor process report the transmittal of the command:
07/25
12:45:34 sndc addr unit 3 : hu H3 (_no_alias_) |
|
07/25
12:45:34 sndc func On : hc H |
Turn off the switch by issuing an off command to the H3
device:
>
heyu off h3 |
|
07/25
12:50:17 sndc addr unit 3 : hu H3 (_no_alias_) |
|
07/25
12:50:18 sndc func Off : hc H |
If these commands fail to turn the switch on and off, try another X10 module, like an AM486 Appliance module. If that also fails, try bringing the wall switch closer to the X10 computer interface, preferably on the same room wiring. The majority of issues I have encountered with X10 projects are often directly associated with the reliability of the fire-and-forget protocol of X10 itself. If you suspect the problem may be the X10 hardware, try swapping the X10 device in question with replacement hardware. You can also have an electrician check for line noise or electrical wiring issues that may be hindering the transmission of X10 pulses from the CM11A interface to the accompanying X10 modules.
Once the computer and CM11A are talking to one another via the heyu command-line interface, we can leverage this functionality by encapsulating it into a web application. This way, we can easily access and control X10 end points from a web browser and ultimately from an Android application.